Yesterday was the Bengali New Year… “Poila Baishak”, that is, first day of the month “Boishak”. Of course India being a multi cultural, multilingual land we could not suffice with just a financial year and a calendar year, we had to have a separate Bengali calendar year (and there are separate regional calendars !!) which begins in mid april, Baishakh being the first month. There are separate names for all the months. The first day of the new year, like every other occasion, is celebrated with good food, new clothes, cultural events and paying respect to elders and sharing greetings by calling up friends and families. This day is also celebrated in other parts of India with different names and associated history. For further info on this you might have to refer to Wiki.
In West Bengal Poila Boishakh is also associated with “Haal Khata”, a festival celebrated mainly by shopkeepers and is marked by closing of the old ledgers, settling old debts and opening a new ledger. Jewellery shops would give you steep discounts on making charges of gold ornaments. Boxes of sweets and snacks would be distributed as a token of goodwill between the trader and the customers.
This year ours was a quiet affair, involving weekend house cleaning and chores, sharing greetings with friends and family – not on WhatsApp or facebook but actually calling them up and chatting with them. That took most of the morning. My MIL cooked us a “Doi Mach” for lunch, to keep it simple and to prep our digestive system for the upcoming dinner invite to one of our cousin’s place. No Bengali occasion is ever complete without sweets and non veg so we had plenty of that and concluded the night with small doses of ‘Unienzyme’ and ‘Gelusil’.
Hangover from last night resulted in a no breakfast mode for us and a simple lunch. Thanks to my MIL I did not have to bother much about food and got time to write a post for you all.
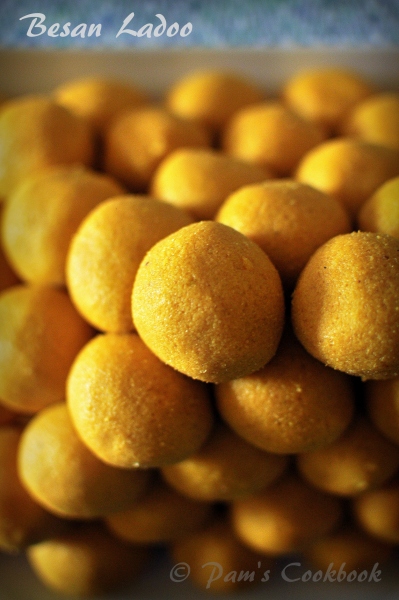
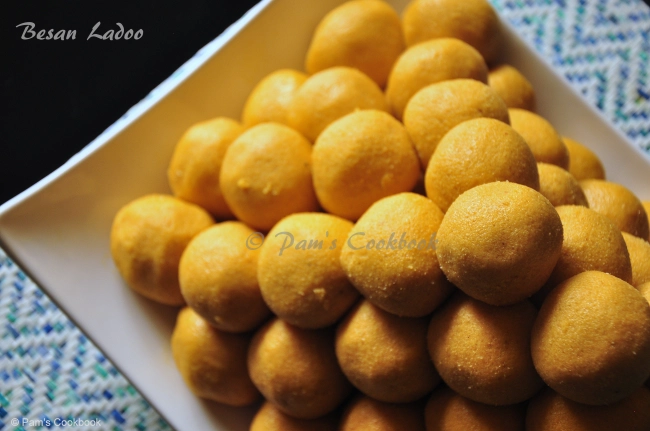
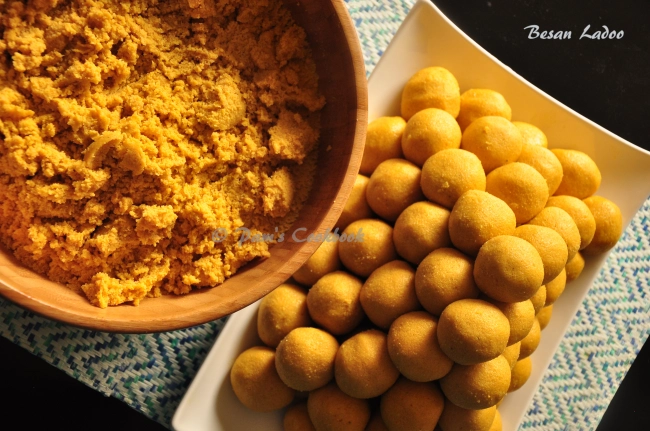
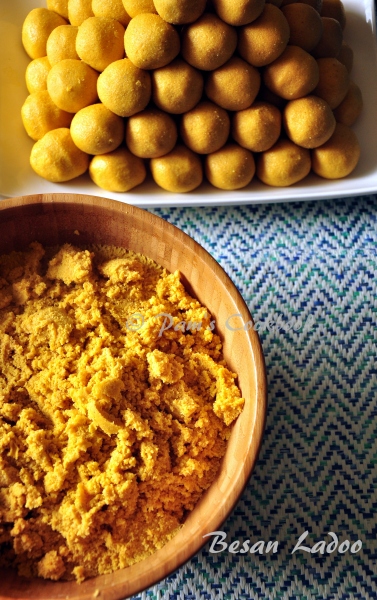
Todays post is a Microwave recipe for besan laddoo that was pending since I last made them during Dusshera 2014. These laddoos were one of the biggest (food related) projects done till date :-). That year, while living in New Britain, CT, I got associated with the Bengali community of Stamford, CT and being one of the volunteers I had agreed to make some 200 laddoos, ultimately making 250 so that I could share the extras with my friends and keep some for myself too. Since it was supposed to be for the Durga Puja I was not comfortable using my regular utensils and hence decided to do it in Microwave. I made it in small batches and it took me 3-4 days to complete them. Since these laddoos store well if kept in an airtight container, time was not a bother and I had plenty to spare then. I would make 3-4 batches of the laddoo mixture in the microwave and keep them aside to cool. As time permitted I would form them into balls while watching a movie, or listening to music or just thinking and contemplating on life. Many of my friends would wonder at the effort I was putting in but honestly it was fun to do. By the second day I actually had a rhythm going on and on completion was amazed myself at the achievement.
I had clicked some good pics out of it and should have posted this long time back. Better late than never. I found this microwave recipe much easier than the traditional style of roasting the besan on flame.
Ingredients:
Ladoo Besan/Coarse chickpea flour – 3 cups. You can also use the regular besan or chickpea flour as well. The only difference will be in the texture.
Ghee – 1 1/4 cup approx. Adjust accordingly.
Cardamom powder – 1/4 tsp
Sugar (fine or powdered) – 1 cup to 1.25 cups or to taste
Chopped nuts of your preference – optional, you can add them into the ladoo mixture before forming the balls or you may garnish the ladoos on top with chopped nuts. I did not use any.
Method:
Take a microwave safe bowl and add ghee to it. No need to cover it.
Microwave it on high for 1 min.
Add the sifted ladoo besan and mix it well with a spatula or a big spoon so that there are no lumps.
Microwave it on high (uncovered) as follows:
2 mins, then take out and mix everything well.
1 min, again take out and mix well
1 min, take out add 1 tsp of water to it and mix everything well. This step is supposed to add on to the grainy texture of the ladoos.
1 min, take out and mix well.
1 min, take out and mix well.
30 sec, take out and mix well. Besan should have a light brownish (or deep golden) color due to the roasting. If making in large quantities and feel the besan has not been roasted well enough, you might have to add another minute of half.
Keep aside to let it cool a little bit.
Once the roasted besan has cooled off a little bit, add sugar, cardamom powder. Add sugar gradually, do a taste test in case you need to adjust the quantity according to your preference. Mix everything well and keep aside for it to cool even further.
Once cool to touch, grease your hands with a little bit of ghee, scoop out a small portion of the mixture and try to form a ball out of it. If it is crumbles and cannot hold the structure then add some more ghee and try making ladoos again.
Once done store them in airtight containers and they will store well for quite some time.
I was thinking a lot about you for the past few days… something that I have fleetingly done over the last two and half years. And yet I could not gather the courage to face you. Not because I did not want to, but because confronting you would mean committing to you, for good and for worse. And I was not sure of that yet. I would have to steal moments here and there… moments that might be rare but would be my very own, just like before. I would have to lie awake late at nights, dark, lit by the light from my computer screen just to be with you. And yet here you are right infront of me, a teeny-weeny but important part of my life that I can no longer ignore. A part that always brought me happiness and content. And as I turned towards you, I realized it was our anniversary too… our seven years anniversary. Strange how time passes by, it feels just like yesterday that we got started. I have not done as much as I would have liked to and that may not change. But I am ready, ready to give you all that I can. I have realized that to get started again there may never be a good time like now. And now is all that matters…
So let me begin by telling you that a lot has happened while you were away… I have changed houses, moved places, different country, new faces, new language, climate, food but most important of all – a lil new person of my own. Ok, not new anymore , he is already a year and half old, keeps me on my toes, running and sprinting after him. Life is full of smiles and laughter and funny faces; Life has a whole new set of worries, anxieties and pressures. I can talk about it the whole day and it would not be enough. But that’s not why I am here. Lets talk about us and why I am here…”
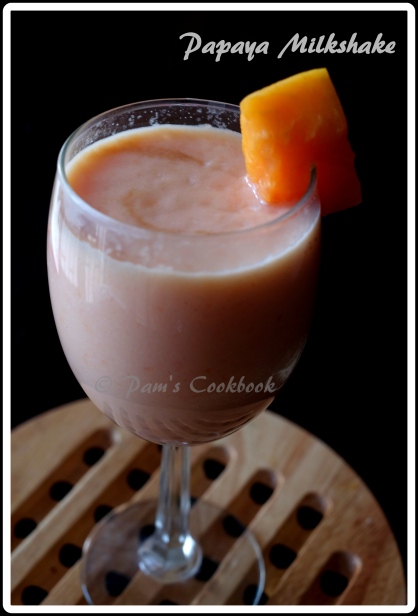
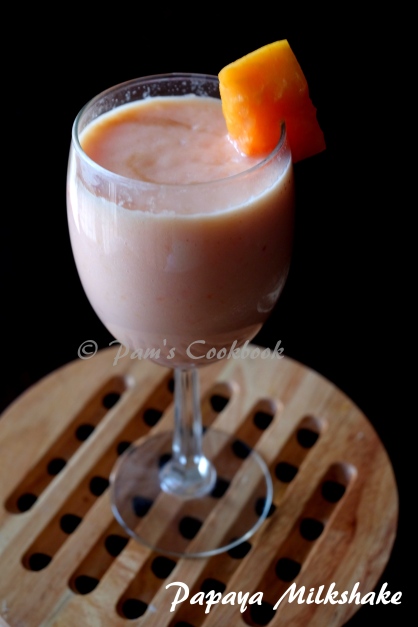
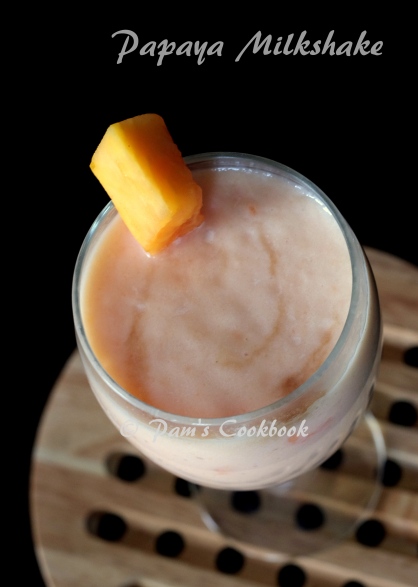
My first post after this long a gap (already feeling refreshed and good to be back) is a nice and cool drink to combat this hot weather and get some good vitamins into your system. A fruit milkshake – I used chilled ripe papaya and some cold milk with a dash of vanilla and some ice cubes. You can also add some chunks of banana to give it a creamier texture but I skipped that. All you need is a blender and you will be all set. Use any fruit of your liking, just browse on the internet what combinations of fruits work best and you can come up with so many healthy variations.
Ingredients: All proportions are as per liking.
Papaya – cooled and cubed – 1 cup + some chopped pieces for garnishing
Cold Milk – 1 cup
Ice cubes – 2-3 (optional)
A dash of vanilla
Sugar or Honey – to taste (Optional, depending on the sweetness of the fruit)
Method:
Take all the ingredients (except ice) in a blender and blend nicely till pureed nicely.
Add the ice cubes and blend once again.
Serve immediately and garnish with some chopped fruit pieces.
My city, like all others, is always buzzing with activity, with people and their busy lives, but this time of the year it is at its peak. This is the festive season, season to celebrate, to rebond with friends and families, to share smiles and exchange furtive glances with your special one. It is the time when everything else is forgotten and forgiven… everything other than love and happiness. Mahalaya brings about the final countdown towards 10 days of maddening glee. Hands filled with bags of bargained and non bargained items, bellies filled with food which is a must after hours of shopping, minds filled with ticking off items from the to do lists while adding some more to it, and hearts filled with content. ‘Pujo ashchey…’
My city, the city of joy, is not always filled with joy. Most often you see it struggling with the nuances of daily lives, with the shackles of its non progressive approach to simple things and competing feebly and, may I add, complacently with the other fast growing cities. The city which was once the capital of this country, which was once and still is the abode of great men and women, the centre for literature, art and culture, now appears to be saddled by its own legacy. Do not get me wrong, I am completely in awe with this place. I came here unwillingly, fell in love with it inspite of all my prejudices and then lived here for 10 years. So I am already a victim of its irresistible charm. I know there is something so special here that will touch your heart and make you yearn for it when you are far far away. May be that is why when I look at other cities and countries, I realise that there will never be a place like Kolkata, but on the other hand I also wish it was so much more… So much potential and yet the stagnancy here drives all us Kolkata lovers away from it. Bengal has always and will continue following the “Cholchey – Cholbey” policy irrespective of who is in power. There was a time when I would defend this city with all reasonings, and with hope. Sitting miles and miles and mountains and oceans apart I am confused at the mixed emotions this city arises in me – to just give up and move on with my life or to hold on to that blind faith that someday something good will happen out of it.
Pic Courtesy: Bedabrata Chatterjee
However this isn’t why I am here. Today I wanted to convey my best wishes for the coming days. “Mahalaya” which in Hindu mythology means Homecoming of the Goddess Durga and the dawn of this day marks the ceremony of ‘Chakshudanam’ – literally meaning giving eyes to the Goddess (the artists, who make the idols, paint the eyes of the Goddess on this auspicious day). And Durga puja, being the main festival of Bengal, is now in its final stages of preparations. I can see it all infront of my eyes… the roads all lighted up, the streets scurrying with innumerable people with their last minute puja shopping before they start pandal hopping, bamboo barricades being set up for the visitors, long queues for big and small restaurants, no place to walk in almost any part of the city.
But amidst all this I can not resist writing about the irony of this day and the bizarre situation of the city with the recent events. While on one hand we are all set to wroship the epitome of feminine power and strength, there is a section of the city (if not whole) which is hurting. Hurting against injustice, struggling against the inaction against female attrocities, fighting against a failing system. While one half of the city is getting together to celebrate, the other half is hoping that their rage will bring some change, will stir the conscience of a dying world, will empower people to have the right to walk and talk freely without being questioned about the lateness of the hour or the length of the dress. As we embark upon the celebratory mood, let us not forget this other half, let us keep reminding ourselves that we have to fight against the disappearing humanity. It might be a long time before we reach that goal, but lets hope and act for a better tomorrow!
So Shubho Mahalaya and may you all have a safe and delightful time!
I have a quick recipe for you – ‘Kalakand’ in microwave. This is an Indian sweet/dessert usually made with milk. Inspite of the hustle bustle of the Puja days, this sweet will take just 18 mins of your time and 2 main ingredients. Although, if in India, you can easily buy it from the local sweet shop wouldn’t it be nice to surprise your guests with this homemade version? This recipe is taken from Showmethecurry
Ingredients:
Ricotta cheese – 15 oz
Condensed Milk – 14 oz
Cardamom powder – 1/4 tsp (optional, but preferred)
Chopped nuts – for garnishing, I used chopped pistachios. (optional)
Method:
Pour the condensed milk into a microwave safe bowl, preferably a square or rectangular one. That way it becomes easy to slice the sweets.
Add the ricotta cheese to it and mix it well witha spoon/ whisk.
Cook it in the microwave as follows:
5 mins – uncovered. Then Take out and mix everything well.
3 mins – uncovered. Then Take out and mix again.
2 mins – covered. Take out and mix again.
2 mins – cross covered / partially covered. Take out and mix again.
2 mins – uncovered. Take out and mix again.
2 mins – uncovered. Take out and mix again.
2 mins – uncovered. Take out and mix again.
Once done, sprinkle the cardamom powder and mix well.
Level out the mixture evenly by pressing it with a spatula or a flat spoon.
Sprinkle the chopped nuts for garnishing and press it lightly onto the surface of the prepared sweet.
Cover it and allow it to cool down and set a couple of hours. You may set it in the refrigerator (if in a rush) for an hour but I avoided it as I did not want it to harden too much.
Once set, take a knife and cut into the desired shape – squares / rectangles / diamonds.
Half a year has already passed by and it seems like just yesterday that we celebrated the start of a new year. Sumner is on its full bloom now, after what has been a very long winter. It feels so good to look outside at the clear blue skies and the greenery all around. I have come to appreciate such days even more, thanks to the East-coast weather.
Last couple of weeks have been quite busy. With the weather improving tremendously, the weeks go by planning summer events, weekend trips and concerts. Reading, movies and friends occupy the rest of the hours. And now-a-days of course the soccer matches. The blog had been going down in my list of priorities. It was only as I was changing the calendar for the month of July that I remembered this post pending since May. So finally, here it is. And though I silently promise to be a bit regular on my blog, I have stopped apologizing to my readers for my disappearances once in a while with the hope that they must have gotten used to it by now.
Today I will talk about the cake I made for my husband’s birthday. Though I love baking, I have not really tried out different cake recipes. Reason is that both of us prefer the sponge cake (recipe) that I had learnt from my mom. However this time I wanted to make something different. A while ago we had got an amazing coffee cake for a friend’s birthday from a nearby bakery. Since then I had been wanting to bake one of my own and what better day to do this than a birthday.
Interestingly, Coffee cake has no coffee in it, quite contrary to what I had assumed. It is known as a coffee cake as it is usually had with coffee.
Stephanie’s Joy of Baking had this recipe of a coffee cake which looked exactly like the one I had had. Being a big fan of her website which has wonderful baking videos and techniques, I did not want to look any further. The original recipe can be found here, the only change that I did was used plain yogurt instead of sour cream. As the recipe suggests using yogurt instead of sour cream gives a lighter textured cake.
Ingredients:
All purpose flour – 1 2/3 cups or 215 gms
Baking Powder – 1 tsp
Baking Soda – 1/2 tsp
Salt – 1/4 tsp
Unsalted butter (at room temperature)- 1/2 cup or 113 gms
White Sugar – 1 cup
Eggs – 2
Vanilla extract – 1 tsp
Sour Cream / Yogurt – 3/4 cup or 180 ml
For the Crumb topping –
Walnuts or Pecans – 1 cup (I used a combination of walnuts and pecans, but you can use other nuts of your preference.)
Light brown sugar – Little less than 1/4 cup
Mini Chocolate chips – 1/3 cup. (I used the semi sweet ones but you can use any that you prefer.)
All purpose flour – 1 tbsp
Ground cinnamon – 1/2 tsp
Method:
Preheat oven to 350 F.
Prepare a baking pan, preferably a spring form pan so that you don’t have to flip the baked cake which might result in messing up the crumb topping. I did not have one so i used a Bundt pan and needless to mention some of the crumb topping came out while flipping it. Whatever pan you choose, grease it with butter and dust it lightly with flour or line the greased pan with a parchment paper.
Prepare the crumb topping –
Dry roast the nuts on stove top or bake in a preheated oven at 350F for 8-10 minutes until lightly browned and fragrant. Let them cool. Coarsely chop them.
In a bowl mix the chopped nuts with the other ingredients mentioned for crumb topping – sugar, chocolate chips, flour and cinnamon and keep aside.
Prepare the Cake Batter –
In a bowl mix flour, baking soda, baking powder and salt, whisk together and keep aside.
In a separate bowl add the softened butter and beat it well using a hand mixer / stand mixer.
Gradually add the sugar and beat well till light and fluffy.
Add the eggs, one at a time and beat well after each addition. Using a spatula or a spoon scrape the sides of the bowl so that everything is well incorporated.
Beat in the vanilla extract.
Next gradually add the flour in three additions alternating with the sour cream. Mix till everything is well combined and there are no lumps.
Assemble the Coffee Cake –
Since the batter will be thick, spoon out half of the batter into the prepared pan and smoothen the top with a spatula or the back of the spoon. If using a Bundt pan spoon out the mixture and place dollops of it all over the pan. This makes spreading the batter, in the Bundt pan, easy.
Sprinkle evenly approximately half of the crumb topping on top of the batter.
Again spoon out the remaining batter into dollops all over the crumb mixture. Lightly level it out so as not to disturb the crumb layer.
Sprinkle the remaining crumb mixture evenly.
Bake for about 40 – 50 minutes or until the cake is done and a toothpick inserted in tehe middle of the cake comes out clean.
Remove from the oven and let it cool for 10 minutes.
If using spring form cake, release the sides of the pan. If using any other cake pan, do what I did – gently flip the cake onto a plate. At this stage some of the crumb topping might come out. Take another plate and flip it once again so that the side with the crumb topping on top faces up. Gather the crumb topping that had come out of the cake and sprinkle it on top of it and press gently.
Note: For a denser texture use sour cream and for a lighter cake use yogurt. Though I used yogurt, I would want to use sour cream the next time to for the denser texture.
This post is specially for my brother who is trying his hand in cooking for the last couple of months. And every time I call up I find him cooking chicken. Earlier I would have been impressed but as they say “I ain’t dumb no longer”. (Sorry Bro, its my blog and I get to say whatever I feel like.) Basically the point I am trying to make is that chicken is probably one of the easiest and a no-fail thing to cook. All the basic ingredients with some twist here and there and it always comes out good. So I was thinking maybe he was taking the easy way out. And then he surprises me by making some authentic Bengali fish preparations that even I have never tried. And that knocked me down… well at least the pics did! So I told him to try something from my blog … what kind of a food blogger would I be if my own brother does not refer to it once in a while. On his request of Chicken Dum Biryani recipe here comes today’s post.
I already have a post on chicken biryani (Pakki) (see here), but that was a long time back when I had first started cooking, clicking and blogging. Since then I feel I have come a long way and hence the need for a newer version of the recipe was in my mind for a long time. More so because now I know that there is no one right method of making biryani. Wikipedia shows an impressive list of the types biryani (see here), but that is a little too overwhelming for me. For now I will stick to the types I have tried.
Kachchi Biryani – Here the raw chicken, marinated with spices is cooked with parboiled rice on Dum (sealed air tight condition) over low heat. You could either do this on stove top or in the oven.
Pakki Biryani – Here the chicken and rice both are cooked to 90% and then layered and cooked on Dum (sealed air tight condition) over low heat. You could either do this on stove top or in the oven.
Irrespective of which method you decide to cook the ingredients remain the same. This recipe is the kachchi biryani style.
Ingredients: Chicken to rice ratio is usually 2:1. Whole /freshly ground spices are preferrable, but most of the times I end up using the store bought Shan’s Biryani Masala and whole cardamom, cinnamon and cloves.
For Chicken:
Chicken 1 kg
Yogurt – 3/4 cup
Ginger paste – 1 tbsp
Garlic paste – 1 tbsp
Green chillies, chopped – 7-8 or to taste
Onions, thinly sliced – 2 large onions
Whole peppercorns – 4-6
Shah Jeera/Caraway seeds – 1/2 tsp
Coriander powder – 1 tbsp
Red chilli powder – 1 tsp or to taste (adjust with the proportion of green chillies added)
Whole garam masala / spices
Green cardamom – 3-4
Black cardamom – 1
Cinnamon sticks – 2 one inch sticks
Cloves – 6
Nutmeg (Jayfal) – 1
Mace (Javitri) – 2-3 (depending on the size)
Lemon juice – 1 lemon
Oil / Ghee / Clarified Butter – 3-4 tbsp + as required for frying onions
Coriander leaves, chopped (Save some for assembling) – 1/2 cup (I usually skip this)
Mint / Pudina leaves, chopped (Save some for assembling) – 1/2 cup (I usually skip this)
Salt – to taste
For Rice:
Long grain Basmati Rice – 500 gms
Bay leaf – 1
Whole Garam Masala:
Green cardamom – 2
Cinnamon sticks – 1 inch stick
Cloves – 2
Whole peppercorns – 2-3
Shah Jeera/Caraway seeds – 1 tsp
Salt – to taste
Oil / Ghee / Clarified Butter – 1 tbsp
Water – as required
You can also use Mace and Nutmeg along with the whole spices, but I usually skip that.
For assembling the Biryani:
Onions, thinly sliced – 2 large
Potatoes – 3 medium sized
Oil / Ghee / Clarified Butter – as required for frying onions and for assembly.
Food color (optional) – I always skip this.
Saffron soaked milk (optional) – 1 tsp saffron added to 1/2 cup. I usually skip this.
For Dum: Chapati dough or foil paper
Method:
Stove-top method:
Heat a pan with sufficient oil and fry the thinly sliced onions till they are nice brown in color. Take care not to burn them. You can fry all the onions (mentioned for chicken and assembling) together and then divide them into equal halves, one for marinating chicken and one for the assembly.
Cut the peeled potatoes in halves and sprinkle some salt and garam masala. Lightly fry them till it gets a light golden color. Drain and keep it aside. These will be cooked completely along with the biryani.
Grind the spices mentioned for chicken – Green & Black Cardamom, Cinnamon, Cloves, Mace, Nutmeg, Shah Jeera, Peppercorns.
Marinate the chicken with all the ingredients mentioned for chicken and keep it in the refrigerator for 2-3 hours or more.
Wash and soak the rice in sufficient water for atleast 30 minutes before cooking.
In a big pan add sufficient water (for cooking rice) and put on boil.
Take a clean cotton cloth and a put the spices mentioned for rice (Whole Garam Masala, pepper corns, Mace & Nutmeg, if using ) and tie it to make a small bundle. I usually add the whole spices directly to water. However if done this way you will get the flavor of the spices and can remove it if you don’t like to bite into the whole spices.
Add the bay leaf and the spice bundle along with salt and oil into the boiling water.
Next add the drained rice to the water and give it a light mix. Let it come to a boil. Once the rice has come to one full boil it will be 50% cooked. Turn off the stove and drain the parboiled rice. At this stage you can remove the bundle of spices. Do not throw away the drained water from the cooked rice as we will be using a portion of it later.
Take a heavy bottom pan for assembling the biryani, put it on high heat and add 1-2 tbsp of oil or ghee to it.
Add the chicken with its marination to the pan, spread evenly and let it fry on high for a couple of minutes, then lower the flame to medium.
Add the fried potatoes.
Layer half of the parboiled rice on top of the chicken layer and spread evenly.
Sprinkle some of the fried onions saved for assembly (from step 1) and a few drops of ghee.
Add little (maybe 1/8th cup) of the drained water (from cooking rice) to it. If using saffron milk add it in place of the water.
Add the remaining rice and spread evenly.
Top it with the remaining fried onions, a couple of drops of ghee, chopped coriander and mint leaves saved for garnishing.
Again add little (approx. 1/8th cup) of the drained water (from cooking rice) to it. If using saffron milk add it in place of the water.
Place the lid of the pan and seal it with the chapati dough. Alternatively. Seal the pan with a foil paper and then place the lid over it. The chapati dough works better.
Lower the flame to low and let it cook for 45 minutes approx. Then turn off the flame and let it rest for 15-20 minutes.
Remove the hardened dough with a knife and carefully open the lid.
Check if the rice is tender. Gently insert a spatula or a wooden flat ladle at the edge of the vessel and lift up the chicken from the bottom of the pan. Do it along the edges of the pan to lightly mix the biryani. Do not over mix the whole thing.
One way of checking the doneness of the biryani is by checking the potatoes. Usually everything will be well cooked by now. If for some reasons it is still not done, place a flat heavy bottomed non-stick pan on heat, once hot, lower the flame and place the biryani pan on top of it, cover it with the lid and let it cook for another couple of minutes.
Serve it with raita and salad.
Oven method:
To cook the biryani in oven, assemble the whole thing as described above in an oven proof pan. Cover it tightly with a foil. Cook it for 45 – 50 minutes in a preheated oven at 350F. Once done, mix gently.
Note: The process may appear to be a little overwhelming but as with all kinds of cooking, repeated practicing is the only way to go. The process was a little lengthy to write down and I was getting lost in between, so dear readers, I apologise for any vagueness or confusion. Do get back to me if you think I need to explain it better.
The pics were taken a while back and am using it for this post.